Knife skills are the unsung hero of home cooking. Master them, and you’ll:
Save time: Efficient cutting means meals come together faster.
Enhance presentation: Uniform cuts make dishes look professional.
Stay safe: Proper technique minimizes the risk of injury.
Whether you’re dicing onions for a stew or slicing tomatoes for a salad, the way you handle your knife makes all the difference.
Choosing the Right Knife for the Job
Every home cook should own at least three essential knives:
Chef’s Knife (8–10 inches): The workhorse—perfect for chopping vegetables, slicing meat, and mincing herbs.
Paring Knife (3–4 inches): Ideal for peeling, trimming, and intricate tasks.
Serrated Knife (Bread Knife): Best for slicing bread, tomatoes, and other foods with tough exteriors and soft interiors.
Understanding Knife Anatomy
Knowing your knife helps you use it better:
Blade: Can be straight-edged, serrated, or granton (with dimples to prevent sticking).
Tip: Useful for delicate cuts or scoring.
Heel: The rear part of the blade—great for tough cuts.
Handle: Should feel balanced and comfortable in your hand.
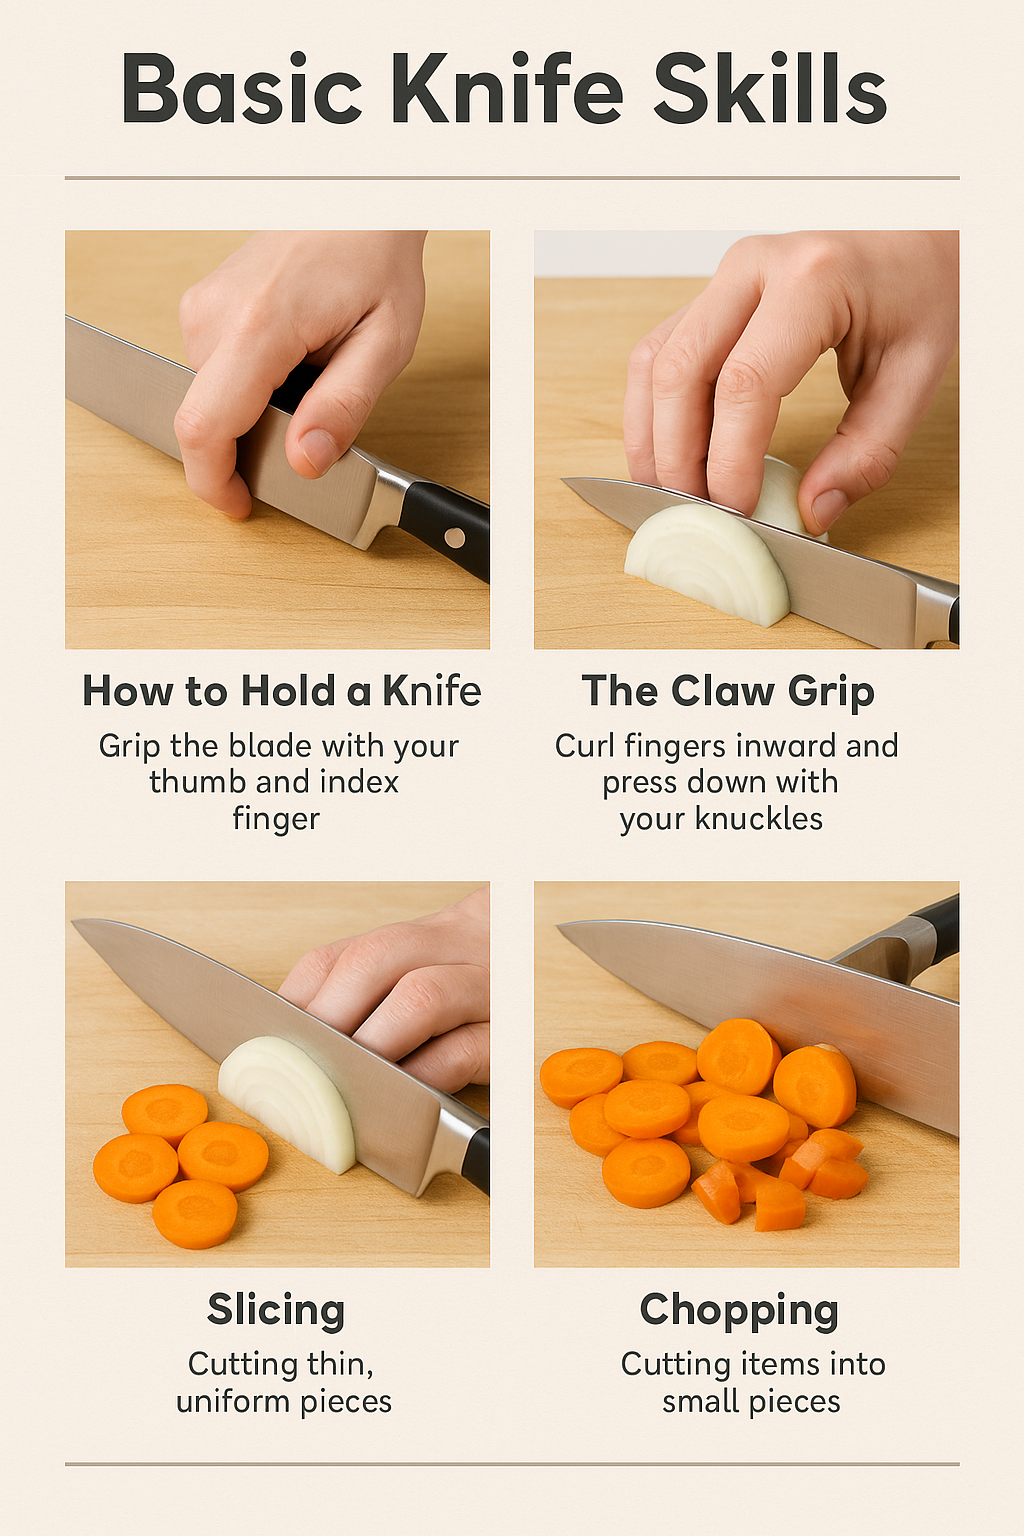
How to Hold a Knife Properly
Pinch Grip: Hold the blade between your thumb and index finger, with the rest of your fingers wrapped around the handle. This gives you control and stability.
Avoid the Handle-Only Grip: It reduces control and increases the risk of slips.
Setting Up a Safe Cutting Station
Use a sturdy cutting board—preferably wooden or high-quality plastic.
Place a damp towel under the board to prevent slipping.
Keep your work area uncluttered.
The 5 Basic Knife Cuts
Slice: Long, even cuts—perfect for cucumbers, tomatoes, and onions.
Dice: Uniform cubes, usually small.
Chop: Quick, rough cuts—great for herbs or rustic dishes.
Julienne: Thin matchstick strips for stir-fries or salads.
Mince: Very fine chopping, often for garlic or herbs.
Rocking Motion vs. Straight Cut
Rocking Motion: The blade stays in contact with the board at one point (usually near the tip) while the handle moves up and down in a smooth arc.
Best for: Herbs, garlic, onions.
Pros: Fast and fluid for repeated small cuts.
Straight Cut: The entire blade lifts off the board and comes down in a single motion.
Best for: Vegetables like carrots or celery, where precision is key.
Pros: Keeps slices uniform, especially for presentation.
Knife Safety Best Practices
The Claw Grip: Curl your fingertips under, with knuckles guiding the knife edge—this keeps your fingers safe.
Cut Away from Your Body: Always direct the blade away from you, never toward yourself.
Avoid Distractions: No phone scrolling or chatting with intense hand gestures mid-cut.
Dry Hands & Handles: Wet hands can cause dangerous slips.
Common Mistakes Beginners Make
Using a Dull Knife: Surprisingly, dull blades are more dangerous because they require more force and can slip easily.
Wrong Knife for the Task: Using a bread knife to chop onions? That’s a recipe for uneven cuts.
Speed Before Accuracy: Start slow—precision is more important than speed.
Crowded Cutting Board: Work in small batches to maintain control.
How to Keep Your Knife Sharp
Honing vs. Sharpening:
Honing realigns the blade’s edge—do this every 2–3 uses with a honing steel.
Sharpening removes material to restore the edge—do this with a whetstone or have it professionally done every few months.
Proper Storage:
Use a knife block, magnetic strip, or blade guards.
Avoid tossing knives in a drawer where the edge can dull quickly.
Practicing Knife Skills at Home
Low-Cost Produce: Start with onions, carrots, celery, and potatoes—they’re cheap and give varied textures to practice on.
Speed vs. Precision Drills:
First, aim for perfect uniform cuts.
Once you can cut evenly, gradually increase your speed without losing accuracy.
Knife Skills for Specific Foods
Onions: Slice in half, make horizontal and vertical cuts, then chop downward for perfect dices.
Tomatoes: Use a serrated knife or a razor-sharp chef’s knife to prevent crushing.
Herbs: Bunch together, then slice with a gentle rocking motion to avoid bruising.
Meat & Poultry: Always slice against the grain for tenderness.
Cleaning and Maintaining Knives
Handwash Only: Never put knives in the dishwasher—heat and detergent damage the blade and handle.
Dry Immediately: Prevents rust and keeps the handle in good condition.
Oil Wooden Handles: Occasionally oil with food-safe mineral oil to prevent drying or cracking.
Leveling Up – Advanced Knife Techniques
Chiffonade: Roll leafy greens like basil or spinach, then slice thin ribbons.
Supreme Citrus Segments: Remove peel and pith from citrus, then cut between membranes for perfect segments.
Filleting Fish: Use a flexible filleting knife for clean, bone-free fillets.
FAQs
1. What’s the best knife for a beginner? A versatile 8-inch chef’s knife is the best starting point.
2. How often should I sharpen my knife? Hone every few uses, sharpen every 3–6 months depending on use.
3. Should I buy expensive knives? Quality matters more than price—look for balance, comfort, and durable steel.
4. What’s the safest way to carry a knife in the kitchen? Hold it by the spine with the point facing down and the blade facing backward.
5. Can I use one knife for everything? You can use a chef’s knife for most tasks, but serrated and paring knives make some jobs easier.
Conclusion: Confidence Through Consistency
Knife skills aren’t learned overnight—they’re built with repetition and mindful practice. Start slow, focus on accuracy, and gradually increase speed. Before long, you’ll be slicing, dicing, and chopping like a pro—making every meal faster, safer, and more enjoyable.